Thursday, June 30, 2011

Fault Tolerance (FT)


What It Is: VMware Fault Tolerance (FT) protects a virtual machine in a VMware HA cluster. VMware FT creates a secondary copy of a virtual machine and migrates that copy onto another host in the cluster. VMware vLockstep technology ensures that the secondary virtual machine is always running in lockstep synchronization to the primary virtual machine. When the host of a primary virtual machine fails, the secondary virtual machine immediately resumes the workload with zero downtime and zero loss of data.
Use Case: On Demand Fault Tolerance for Mission-Critical Applications.
VMware FT can be turned on or off on a per-virtual machine basis to protect your mission-critical applications. During critical times in your datacenter, such as the last three days of the quarter when any outage can be disastrous, VMware FT on-demand can protect virtual machines for the critical 72 or 96 hours when protection is vital. When the critical periods end FT is turned off again for those virtual machines. Turning on and off FT can be automated by scheduling the task for certain times. Refer to Figure. below showing a server failure while running two virtual machines protected by VMware HA and a third virtual machine protected by FT.

The HA-protected virtual machines are restarted on the other host while the FT-protected virtual machine immediately fails over to its secondary and experiences no downtime and no interruption.
Step 1: Turn on VMware Fault Tolerance for a virtual machine 

Once your cluster is enabled with VMware HA, you can protect any virtual machine with VMware FT, given that the following prerequisites are met:
1. The ESX host must have an FT-enabled CPU. For details please refer to http://kb.vmware.com/kb/1008027.
2. Hosts must be running the same build of ESX.
3. Hosts must be connected via a dedicated FT logging NIC of at least 1 Gbps.
4. Virtual machine being protected must have a single vCPU.
5. Virtual machine’s virtual disk must be thick provisioned.
2. To enable a virtual machine with VMware FT, right-click the virtual machine called Win2003_VM01 on esx05a, select Fault Tolerance, and click Turn On Fault Tolerance. Please note that you will need cluster administrator permissions to enable VMware FT.


Step 2: Convert virtual disks to thick-provisioned virtual disk
VMware FT requires the virtual machine’s virtual disk to be thick provisioned. Thin-provisioned virtual disks can be converted to thick-provisioned during this step.
1. A dialog box will appear indicating that virtual machines must use thick-provisioned virtual disks. Click Yes to convert to thick-provisioned virtual disks and continue with turning on VMware FT.


Step 3: Observe the following actions after turning on VMware FT The process of turning on FT for the virtual machine has begun and the following steps will be executed:
1. The virtual machine, Win2003_VM01, is designated as the primary virtual machine.
2. A copy of Win2003_VM01 is created and designated as the secondary machine.


3. The secondary virtual machine is migrated to another ESX host in the cluster, esx05b in this case. VMware DRS is used to determine what host the secondary virtual machine is migrated to when FT is turned on. For subsequent failovers, a host for the new secondary virtual machine is chosen by VMware HA. Win2003_VM01 is now labeled as Protected under Fault Tolerance Status.


Step 5: Observe vSphere Alarms after Host Failure
Certain alarms are built into VMware vSphere to signal failures in ESX hosts as well as virtual machines. During the host failure invoked above, you can see an alarm for the FT-protected virtual machine.
1. Click the Alarms tab for Win2003_VM01. Here an alarm is generated even though the virtual machine’s workload continues to run uninterrupted because of VMware FT.


Click the Alarms tab for the rebooted ESX host, esx05a, to see the change in the host connection and power state.

Distributed Resource Scheduler (DRS)

What It Is: VMware Distributed Resource Scheduler (DRS) automatically load balances resource utilization across a cluster of ESX hosts by using VMotion to migrate virtual machines from a heavily utilized ESX host to a more lightly used ESX host. VMware DRS analyzes the CPU and memory consumption of a virtual machine over time to determine whether to migrate it.

Use Case: Redistribute Virtual Machines off of an ESX Host during Maintenance

VMware DRS migrates virtual machines off of an ESX host when a user enters that host into maintenance mode. DRS will intelligently migrate virtual machines to other available hosts in the DRS cluster in a load-balanced manner. After the maintenance on that host is completed and the user takes it out of maintenance mode, DRS will then migrate virtual machines back onto the host.

Step 1: 
Turn On VMware DRS for a cluster.
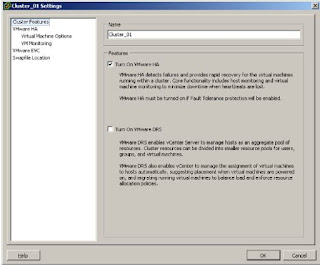
In this step, you will turn on VMware DRS for a cluster of ESX hosts that you created earlier. To turn on VMware DRS on your cluster see Figure
1. Right-click the cluster and select Edit Settings.Under Cluster Features select Turn On VMware DRS. Each host in the cluster will now be configured for VMware DRS. Please note that you will need cluster administrator permissions to edit the cluster settings.

 
Step 2: Set automation level for DRS cluster.

In this step you will be able to configure your DRS cluster to automatically balance your virtual machines across the cluster or simply provide recommendations to the user on where to migrate the virtual machines to achieve a load balanced cluster. Configuring the automation level of VMware DRS for the cluster is shown in Figure. You can also configure the automation level for each virtual machines within the cluster—explained in Step 3 below.
1. Click VMware DRS in the cluster settings window and you will notice that the automation level is set to Fully automated by default. The fully automated level optimally places virtual machines within the cluster upon powering them on, as well as migrates virtual machines after power on to optimize resource usage. You can adjust the sensitivity of the automated level by moving the slider bar to more conservative or more aggressive.
2. The partially automated level only places virtual machines within the cluster upon power on and then gives recommendations on where to migrate them to optimize resource usage.
3. The manual level gives placement recommendations at power on as well as where to migrate them later.
For this evaluation leave your VMware DRS settings at the default of Fully automated with the Migration threshold set in the center level.

 
Step 3: Set automation level for each virtual machine.
In this step, you will be able to configure each virtual machine, to be automatically balanced across the cluster or simply provide recommendations to the user on where to migrate the virtual machine to achieve a load balanced cluster.
1. To adjust the automation level for each virtual machine, click Virtual Machine Options under “VMware DRS” in the cluster settings window. For this evaluation keep your Virtual Machine Options set at their default values.


High Availability (HA)


What It Is: VMware High Availability (HA) utilizes heartbeats between ESX hosts in the cluster to check that they are functioning. When a host failure is detected, VMware HA automatically restarts affected virtual machines on other production servers, ensuring rapid recovery from failures. Once VMware HA is configured, it operates without dependencies on operating systems, applications, or physical hardware.

Use Case: Protect Virtual Machines from Server Failures

When running Web servers or databases that are critical to your business, VMware HA ensures they will be restarted immediately upon failure of their servers. Interruption to your business will be minimized as the virtual machine is restarted on another available server in your HA cluster.

Step 1: Turn on VMware HA on a cluster

VMware HA can only be turned on for a cluster of ESX hosts. Please ensure that you have followed the prior steps in creating a cluster of ESX hosts. Please also ensure that DNS is set up and working properly, including forward and reverse lookups, fully-qualified domain names (FQDN) and short names. Consult your network administrator for assistance in DNS configurations.

It is also recommended you set up alternate isolation response address (best practice).

  1. To enable VMware HA on your cluster, right-click the cluster and select Edit Settings. The cluster settings window should appear.
  2. Under Cluster Features of the cluster settings window, select Turn On VMware HA. Each ESX host in the cluster will now be configured for VMware HA. Please note that you will need cluster administrator permissions to edit the cluster settings.


Step 2: Set Admission Control and Additional VMware HA options

You may want to set additional VMware HA options to allow for admission control, monitoring and setting policies for your hosts and virtual machines. These can be configured under VMware HA in the cluster settings window. The following is a listing of these addition features.

• Disabling host monitoring will allow you to perform ESX host maintenance without triggering VMware HA into thinking the host has failed.

• Admission control allows you to control whether virtual machines should be restarted after host failures depending on if resources are available
elsewhere in the cluster. VMware HA uses one of three admission control policies: 
 
1) tolerate some number of host failures, 
2) specify a percentage of cluster resources or, 
3) specify a designated failover host.

VM monitoring restarts virtual machines after their VMware Tools heartbeat is lost, even if their host has not failed. The monitoring sensitivity level can be set for each virtual machine.


vSphere 8 Security Configuration & Hardening

    The VMware vSphere Security Configuration & Hardening Guide (SCG) has evolved significantly over the past fifteen years, remaining...